SQL Server 2012 – Configuring AlwaysOn
February 2, 2013
This is a follow on to my initial post which was a high-level overview of the SQL Server 2012 Always On feature.
Since then a project has come up which requires SQL Server Always On feature and SQL Server Master Data Services. In preparation for this task I started compiling high level steps on what would be involved when installing/configuring AlwaysOn.
Hopefully you’ll find it useful too.
Windows Failover Cluster
- Install/configure Windows Failover Cluster feature on all nodes that will participate in AlwaysOn using Failover Cluster Manager
- Add the nodes that will participate in the cluster
- Provide Cluster name (windows name) and VIP – this creates DNS and AD objects.
Enable AlwaysOn in SQL Server Configuration Manager
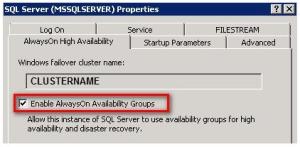
- SQL Server Configuration Manager – SQL Server properties – Notice the extra tab for AlwaysOn. The value here displays the Windows Cluster name. If the Windows cluster is not configured, it will mention this in the field. Check the AlwaysOn text box.
- Repeat this on each node individually, or use SQL Powershell cmdlets from SSM.
[Enable -SqlAlwaysOn -ServerInstance xxx -Force]
Configure AlwaysOn
- SSMS, AlwaysOn section, use the AlwaysOn wizard.
- Create AlwaysOn Name
- Select the databases to be part of AlwaysOn
- Select Replicas, Automatic Failover, Synchronous commit, Read only on Secondary
- Add other nodes, with same settings as above.
- There are other tabs here, Endpoints, backup preferences and listener.
- Select initial data synchronization – http://msdn.microsoft.com/en-us/library/hh231021.aspx
- Allows you to script out process or let wizard do the work.
Simulating Failover
- SSMS, Right click the AlwaysOn Availability group and select failover
- Select instance to use as failover node.
- Connect to that instance
- A script can be generated at this point for this process or let the wizard action:
ALTER Availability group [xx] FAILOVER
- Applications will fail / Clients disconnect – if specifying the instance name.
- Challenge is to make applications failover seamlessly.
- This is where we use the listener tab mentioned above.
- Add the listener name.
- This creates the AlwaysOn listener name which is the virtual name for the AlwaysOn group.
- If the application or client is specifying this listener name then the failover will be seamless to the client, redirecting to the correct instance that’s hosting the primary replica.
Backups
- Great tip here on backups: http://www.mssqltips.com/sqlservertip/2880/backing-up-sql-server-databases-participating-in-availability-groups
Thanks for reading.
Understanding the difference between the Windows Server cluster active node and the SQL Server cluster active node
October 10, 2012
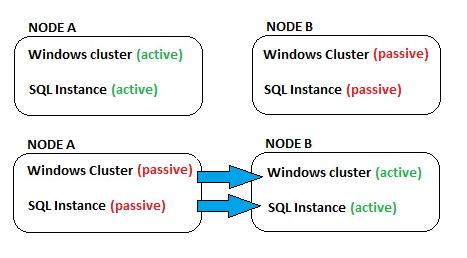
Could there be scenario where a SQL cluster active node was running on a Windows cluster passive node? In other words, could your SQL Server application failover without the Windows Cluster failing over? This topic is worth understanding so that it does not catch you out at 3am – the favourite DBA callout time.
Environment
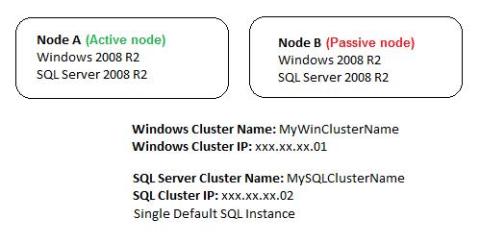
For the purpose of this tip we will use the following 2 node cluster configuration (active/passive):
Failing over SQL Server
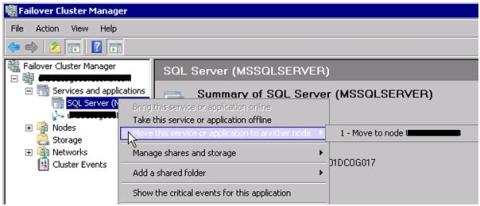
Within the Failover Cluster Manager tool you can move an application to another node. This is typically how you would test the SQL Server failover process. Expand the FailoverCluster Manager tree – cluster name – Services and Applications and right click your SQL Server Instance and select ‘Move this service or application to another node’.
After confirming the move you will notice the resources going down, moving to the other node and coming up again. If you connect to your SQL Cluster Cluster IP now and run the following T-SQL query, it will confirm the active SQL Server node.
Select ServerProperty('ComputerNamePhysicalNetBIOS')
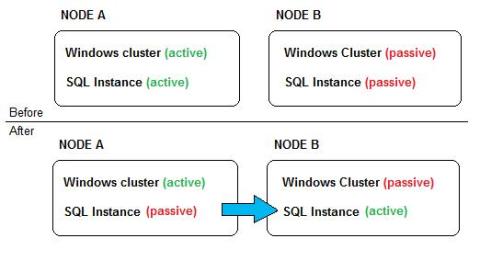
The following diagram illustrates what we’ve achieved by moving the SQL Server application to the other node.
Let’s verify this by comparing the Windows and SQL Cluster active node information
- Connect to your Windows cluster IP (xxx.xx.xx.01) using Remote Desktop. Note it is the default behaviour that when connecting to a Windows Cluster IP you are directed and connect to the Active Windows node.
- Open Windows Server Manager from Administrative tools and note the computer name
- Open SQL Server Management Studio and connect to your SQL Cluster name (MySQLClusterName)
- Run the following query to confirm the SQL Cluster active node
Select ServerProperty('ComputerNamePhysicalNetBIOS')
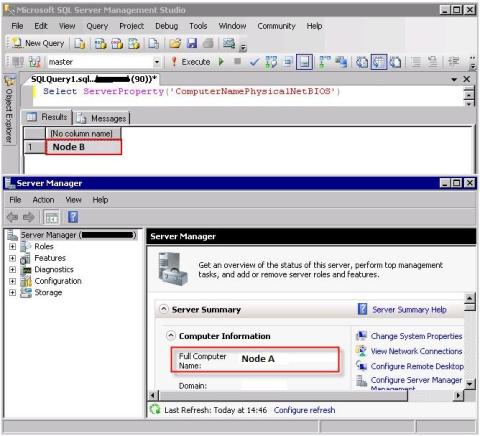
Summary: By connecting to the Windows Cluster IP, we are automatically directed to Node A as it is the Windows Cluster Active node, which is technically correct. The Node A server has not gone down or experienced any server level error to cause a failover. However, as we’ve moved SQL Server to the Node B, from a SQL Server point of view, Node B is the active node.
Now let us try the following steps:
- Connect to your SQL Server cluster IP (xxx.xx.xx.02) using Remote Desktop. Note it is the default behaviour that when connecting to a SQL Cluster IP you are directed and connect to the Active SQL node.
- Open Server Manager from Administrative tools and note the computer name
- Open SQL Server Management Studio and connect to your SQL Cluster name (MySQLClusterName)
- Run the following query to confirm the SQL Cluster active node
Select ServerProperty('ComputerNamePhysicalNetBIOS')
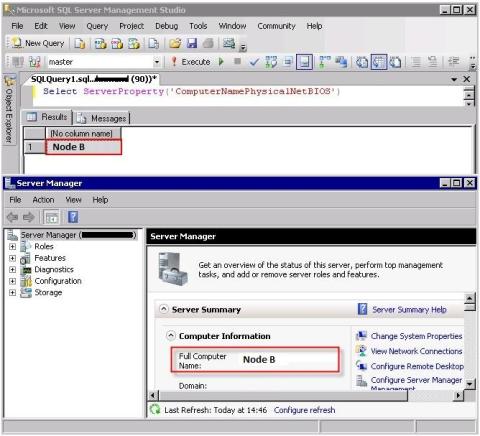
Summary: By connecting to the SQL Cluster IP, we are automatically directed to Node B as it is the SQL Cluster Active node.
Failing over Windows Server
If we were to initiate a windows level failover by shutting down server (Node A), then the following scenario would occur. Both Windows and SQL would failover to the same node.
Lessons Learnt
- Do not assume the active node in a cluster, verify it using code.
- Understand that the Windows Active node may not necessarily be the SQL Server Active node.
- Initiating a true failover at windows level, would failover both Windows and SQL Server to to the other node.
- When specifying a SQL Server name in your code or connection strings always specify the SQL Cluster name or IP. Do not use the Windows Cluster name or IP.
Thanks for reading.
Cognos Business Intelligence Overload
October 1, 2012
What a week! 40 hours of dedicated-ignore-every-call-and-email Cognos installation & configuration with an IBM consultant on-site. A very rare opportunity which I was really looking forward to! It’s unheard of in a DBAs world to be given the time to focus EXCLUSIVELY on one single task. I was literally treated like a developer, lock him in a dark room, throw some food in every now and again but leave him alone for 5 days.
A few months ago I had been on a 5 day Cognos course which really put me in a great position to support our relatively small (3 server) environment. However, when this high-availability Cognos project surfaced, (with aggressive timelines as they always do), I knew it would be a whole new ball game supporting an 8 server High Availability environment.
To be built alongside our current production environment with no downtime during office hours. The existing application server would then be ‘slotted’ into this new HA environment over a weekend.
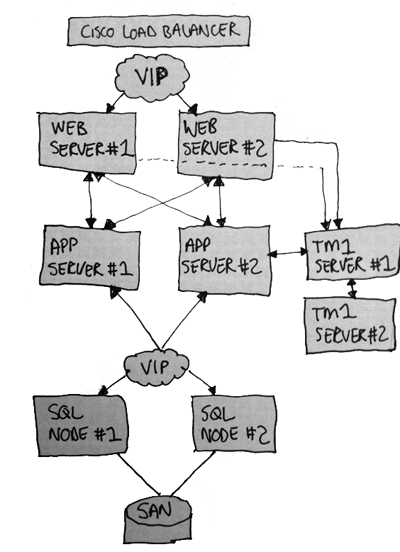
The installation/configuration comprised of the following components:
- SQL Server Cluster (2 nodes, Active/Passive configuration)
- 2 web servers, load balanced, accessed by virtual IP (Cognos TM1 Web, Contributor and BI Gateway)
- 2 Cognos BI Application Servers (Content Stores & Dispatchers)
- 2 TM1 Servers (1 activing as a warm standby)
- Combination of 32 & 64bit Cognos installs. Our servers are 64bit however some Cognos elements are only available in 32bit version.
- Produced full documentation of all installation steps
- Produced full documentation of all configuration steps
- Produced full documentation of all errors/troubleshooting
- Cognos Software included the following components:
- Cognos BI
- TM1 Web
- TM1 contributor
- TM1 Server/Architect
A week well spent. Not just following installation and configuration steps parrot fashion, and having a general idea, but really having the time to test each component. Having the time to ‘break’ and adjust settings and really understand how each component hangs together, load balances and behaves.
It’s been a case of perfect timing of the following three elements: knowledge + training + hands-on experience.
It’s a project that I’m immensely proud of and have been instrumental in it going ahead on time. Towards the end of our week, while troubleshooting an error and finding the solution, the IBM consultant laughed and remarked ‘soon you’ll be hunted down by IBM’ – which really put the cherry on top.
Fast forward one week: I spent all of Saturday ‘slotting’ in the existing application server into this new environment. It’s Monday morning and I arrived at work with that fear. Expecting the Asia Pacific user base to have encountered serious issues. I quickly scanned my emails and nothing surfaced. A job well planned and executed.
Are you setting up a scaled out Cognos environment? Come across any issues that you’d like to discuss? Contact me, I’d be happy to assist. Now it’s back to the bread and butter daily DBA tasks & supporting this BI beast.
Thanks for reading.
Reporting Services – SQL Server 2008 Cluster
September 9, 2012
I created the following notes when configuring Reporting Services in our SQL Server 2008 active/active cluster. This particular SQL Cluster installation comprised of 2 SQL instances and 2 Cluster nodes. One SQL instance running on each node, hence active/active.
High level steps were as follows:
- Install Reporting Services on each node but do not configure when prompted in the install wizard
- Specify the same database on each report server using the Reporting Services configuration tool.
- Join the report server instances to each other by completing the scale-out area in the Reporting Services Configuration tool.
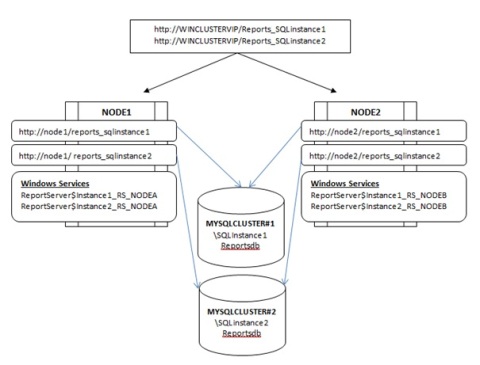
We were attempting to achieve the below scenario:
RS Service & Binary Installation
- On Node1, run setup – Installation – new installation or add feature.
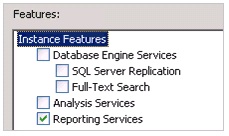
- Select ‘Reporting Services’ from the feature list
- Select new instance name for this RS: Instance1_RS_NODEA
- Enter service account
- Install but do not configure.
- Repeat the above on Node1, specifying the instance name as: Instance2_RS_NODEA
- At this point, there will be two RS services on Node1 named;
- [ReportServer$Instance1_NodeA] and
- [ReportServer$Instance2_NodeA]
- Repeat the above steps on Node2, specifying Instance1_NodeB and Instance2_NodeB
- At this point, there will be two RS services on Node2 named;
- [ReportServer$Instance1_NodeB] and
- [ReportServer$Instance2_NodeB]
Reporting Services Configuration
- On Node1, run ‘Reporting Service Configuration Manager’
- Connect to Instance1_RS_NODEA.
- Web service URL: http://node1:80/ReportServer_SQLinstance1
- Database: Create a new RS database
- Server name: MYSQLCLUSTER1\SQLInstance1
- Set Report Manager: http://node1:80/Reports_SQLInstance1
- Setup email, backup encryption keys.
- Exit
- On Node1, run the ‘Reporting Service Configuration Manager’
- Connect to Instance2_RS_NODEA
- Web service: http://node1:80/ReportServer_SQLinstance2
- Database: Create a new RS database
- Server name: MYSQLCLUSTER2\SQLInstance2
- Report Manager: http://node1:80/reports_SQLInstance2
- Setup email, backup encryption keys.
- Exit
At this point; we have Node1 with the two Reports URL’s pointing to the two reports database, each hosted on separate SQL Instances.
- On Node2, run ‘Reporting Service Configuration Manager’
- Connect to Instance1_RS_NODEB Web Service URL: http://node2:80/reportServer_SQLInstance1
- Choose an existing report server database, connect to the cluster (MYSQLCLUSTER1\SQLInstance1) and select ReportServer
- Report Manager: http://node2:80/reports_SQLInstance1
- Encryption key already done on first node.
- On Node2, run ‘Reporting Service Configuration Manager’
- Connect to Instance2_RS_NODEB
- Web Service URL: http://node2:80/reportServer_SQLInstance2
- Choose an existing report server database, connect to the cluster (MYSQLCLUSTER2\SQLInstance2) and select ReportServer
- Report Manager URL: http://node2:80/reports_SQLInstance2
- Encryption key already done on first node.
We’ve now configured and joined RS on Node2 to Node1.
- On Node1, Run the ‘Reporting Service Configuration Manager’ and connect to SQLInstance1
- Click on ‘scale-out deployment’
- Add the server and click on Join. The status should change from ‘waiting to join’ to ‘joined’.
- Repeat the above 3 steps for SQLInstance2
The final result should be as follows:
Node1
http://Node1:80/reports_sqlinstance1
http://Node1:80/reports_sqlinstance2
Node2
http://Node2:80/reports_sqlinstance1
http://Node2:80/reports_sqlinstance2
Windows Cluster URL
http://WinClusterVIP/reports_sqlinstance1
http://WinClusterVIP/reports_sqlinstance2
It may seem very complicated but hopefully by referring back to the diagram as you step through the instructions things will become cleared and make sense. Thanks for reading.
AlwaysOn Availability groups
September 1, 2012
I’ve setup a few SQL Server Mirroring and Log shipping solutions and have been keen to find out what the ‘AlwaysOn’ availability groups was all about in SQL Server 2012.
It’s the successor to database mirroring.
I’ve always thought database mirroring was pretty cool and a step up from log shipping, it had its draw backs yes, but overall I’ve been pretty impressed by the whole thing. Turns out, it’s a bit like the short lived mini-disks players, short lived. Poor thing. It was introduced as recently as SQL server 2005 SP1 and now soon to be discarded and superseded by AlwaysOn Availability groups.
Log shipping on the other hand has survived. Ye ‘ol faithful!
Database mirroring is still available in SQL Server 2012, but it’s marked as a Deprecated Feature.
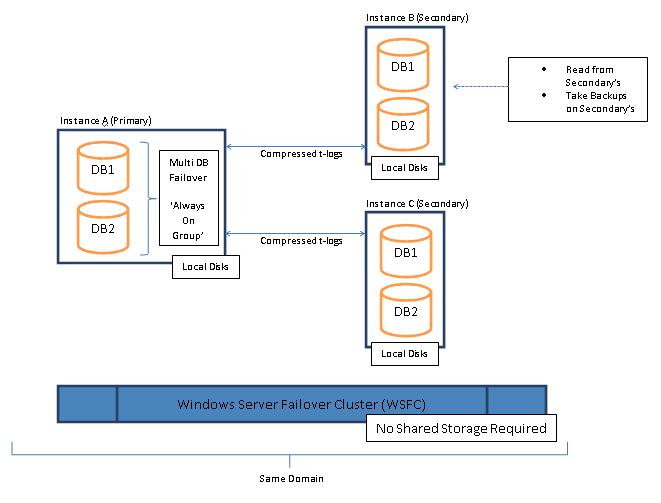
The below is a really high level quick overview of the new feature in the high availability stack in SQL Server 2012.
- Multi database failover
- Able to read the inactive node
- Able to take backups on inactive nodes
- Multiple nodes (1 x primary and up to 4x secondary/replicas)
- It uses t-logs with compression
- Based on Windows Server Failover cluster (but you don’t need any shared disks)
- SQL Server nodes use local storage
- There is no witness server, uses the WSFC quorum
- Always ON must be on same domain
SQL 2008 R2 Cluster – SP1 update failure
August 28, 2012
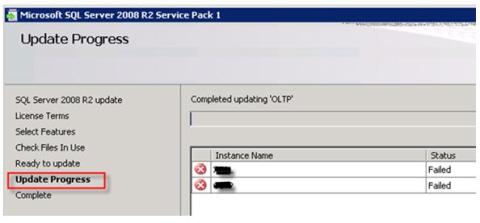
I came across this strange error when applying SP1 to a SQL 2008 R2 Cluster. The Service Pack 1 install failed with the following error:
Error 1334. The file ‘ENG_SEI_RsFxDrv_0151_inf_64’ cannot be installed because the file cannot be found in cabinet file ‘Redist.cab’. This could indicate a network error, an error reading from installation media, or a problem with this package.
The failure occurred on the following screen:
The second part of the error message indicated ‘network error, error reading from install media’ – so I initially tried to copy the setup files locally (this is something usually do, but in this case I did run the setup from our software share) – but it failed again with the same error.
After a lot of digging around and ‘googling’ on various keywords in the error log, I discovered that the ‘RsFxDrv’ part of the error related to the ‘FileStream’ SQL Server feature. Note: I had not enabled Filestream during the original SQL Server setup.
Resolution
I enabled ‘Filestream’ as per http://msdn.microsoft.com/en-us/library/cc645923.aspx and then re-applied Service Pack 1 and the update completed successfully!
I’ve not had a chance to test this any further and I don’t believe that this approach is required for everyone out there (i.e. having to enable filestream on a SQL Cluster before applying SP1) – but hopefully if anyone does come across this strange error, it will help them get past it.
The Filestream feature can always be disabled after patching, but it’s a quick, easy way to get past this error and move on to bigger and better things like supporting, monitoring and working with your new cluster!
Thanks for reading.
